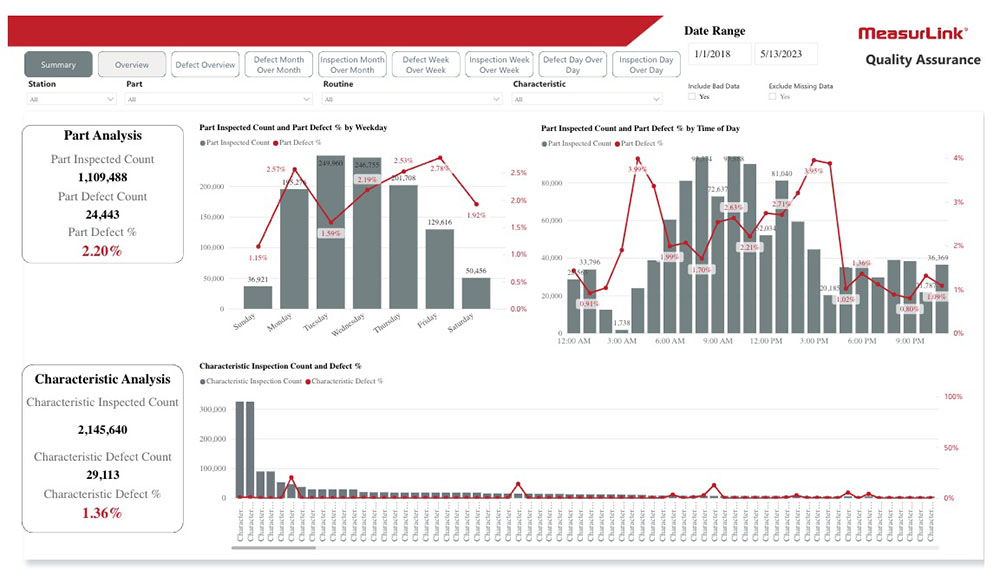
Using that data, “managers can make sound business decisions more quickly, based on reports that are visual, interactive and dynamic,” he adds. Another plus is that the report, while a turnkey product, is adaptable.
Buyers have “the flexibility to fine-tune it and make adjustments,” Abdel-Motaleb explains. “If there are key performance indicators (KPIs) they’re interested in that are not a part of the report, they can add those in.”
For machining and manufacturing companies operating in a highly competitive industry that forces many businesses into the margins where improving productivity or reducing costs by even a fraction of a point can make all the difference, the increased insight available from analytics can be a game-changer, he says.
‘Evaluate a Million Data Points’
Identifying production pain points in the late afternoon or during overnight shifts, for example, enables managers to consider whether workers need more breaks at those times or additional training—or whether equipment might require additional maintenance to improve productivity and quality.
The system allows users “to evaluate a million data points with just a few clicks,” Abdel-Motaleb explains. “That’s really the power that we’re seeing here with using and leveraging some of these new technologies, but again, none of this is possible unless we’ve collected the data.”
Which is where MeasurLink comes in. The platform, which Mitutoyo has been providing and upgrading for roughly two decades, pulls data from inspection tools such as micrometers and calipers, as well as CNC equipment and coordinate measuring machines, into a centralized location where engineers and production and quality managers can analyze it.
After gleaning broad insights from the Defect Analytics Report, customers seeking more granular data on their discoveries can leverage MeasurLink for information that might help them determine whether specific tools or machines need upgrades or replacement.
Addressing such issues before breakdowns that can damage a workpiece—or even costly equipment itself—may prove invaluable to machining and manufacturing firms grappling with challenges from inflation to a labor shortage expected to reach 2.1 million jobs by 2030. A customer base demanding increasingly precise work from ever more exotic metals is squeezing them even further.
'Get It Right the First Time'
The equipment used to craft such workpieces—some of which are used in the burgeoning electric vehicle industry or the high-tech and highly regulated field of aerospace—is constantly improving, enabling operators to deliver tighter tolerances.
But those improvements in capability also demand more precise metrology equipment such as the variety of tools made by Mitutoyo to ensure the machines are performing as expected.
“The cost of scrapping pieces increases when you’re working with more expensive materials,” Abdel-Motaleb says, “and machine shops need to do everything that they can to prevent that from happening. Having access to and reviewing historical data to understand what they’ve done in the past and using that information to make adjustments to their manufacturing process enables them to get it right the first time.”
That can be particularly important in the aerospace industry, for example, where customers often place orders for small quantities of more complex parts.
“When you’re working with a large, expensive part that takes a long time to produce, if you have to scrap it, you’ve wasted an entire day or days, losing all of that money,” Abdel-Motaleb explains. “It’s not like producing a bunch of washers where having to throw a bunch away isn’t as big a deal.”
What trends would your machine shop analyze with the Defect Analytics Report? Tell us in the comments below.


Talk to Us!
Leave a reply
Your email address will not be published. Required fields are marked *